Configuring Migration Manager
Overview
Before Migration Manager can be used to migrate users, it must be configured. The settings that control the behavior of Migration Manager are stored in a single XML configuration file which makes it possible to create different configuration files for different migration scenarios.
The configuration files are useful since they allow an administrator to pre-define behavior and what should be migrated ahead of time so that Migration Manager later can be automated to perform those actions for a large number of users on a large number of systems.
Migration Manager Settings
There are 3 major types of settings for Migration Manager:
- The location of the user state data (i.e. where user state data should be written to and read from).
- The behavior of Migration Manager, defined using the Preferences dialog.
- The content to process in the migration (applies to extractions only).
This section describes all 3 types of settings.
Data Store Location
The data store location controls where Migration Manager reads and writes user data from/to. This setting is stored in the configuration file, but can also be overridden from the command-line for automation purposes (see the “Migration Manager Automation Guide” for details on the command-line capabilities of Migration Manager).
In the user interface this setting can be changed both from the File menu and in each of the task views.
| Note |
|---|
Do not set the data store path to be the root of a drive (e.g. C:\). In Windows 7 and later, most users (including administrative users) do not have permissions to create files in the root of a drive, which causes a problem when Migration Manager attempts to create a file in the data store to validate that it can write to the data store. The recommended approach is to use a sub-directory for the data store (e.g. C:\Personalities). This also reduces the number of directories Migration Manager needs to examine when searching for personalities in the data store. |
Preferences Dialog
The preferences dialog lets you define settings that control the behavior of Migration Manager during both extraction and injection. It also controls logging. The dialog contains:
- Extraction Policies - Policies for the extraction process
- Injection Policies - Policies for the injection process
- File Replacement Rules - Policies for replacing files
- Log File - Policies for logging
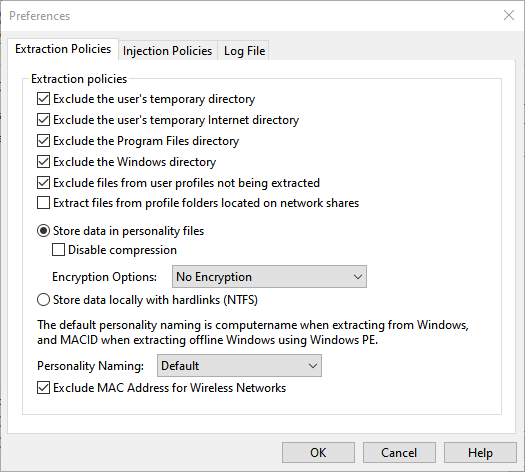
Extraction Policies
| Policy | Effect |
|---|---|
| Exclude the user’s temporary directory | Causes Migration Manager to skip any files located in the user’s temporary files directory. |
| Exclude the user’s temporary Internet directory | Causes Migration Manager to skip any files located in the user’s temporary Internet files directory. |
| Exclude the Program Files directory | Causes Migration Manager to skip any files located in the Program Files directory (both the 32- and 64-bit directory on 64-bit systems). |
| Exclude the Windows directory | Causes Migration Manager to skip any files located in the Windows directory. |
| Exclude files from user profiles not being extracted | Causes Migration Manager to auto-generate exclude file rules that exclude the profile directories of those users not being extracted. |
| Extract files from profile folders located on network shares | When enabled, files located in profile folders located on a network share (e.g. a user’s My Documents folder that has been redirected using Folder Redirection) to be included in the extraction. If disabled, these files are not extracted. See Planning a Migration Project with Migration Manager for more information about Roaming Profiles and Folder Redirection considerations. |
| Store Data in personality files | When selected, data files are stored within Migration Manager personality files and are not browseable outside of using Migration Manager. This is the default behavior and most typical migration scenario. This method of data storage allows for compression and encryption during the migration process. |
| Disable compression | Disable the file compression used when storing files that are part of the extracted user state data. Using compression helps reduce the amount of disk space required to store the user state data and it’s recommended that this policy be left disabled (which is the default). |
| Encryption Options | This policy allows the selection of no encryption, AES256 with password, or AES256. Using AES256, without password, will encryt the data in the data store using a built-in key. When using AES256 with password, any extraction performed through the user interface will prompt for a password that should be used to protect the extracted user state data with AES256 encryption (password must be 7-15 characters, numbers, or underscores). For extractions performed through the command-line you need to use the /PASSWORD parameter. See the Migration Manager Automation Guide for more details. |
| Store data locally with hardlinks (NTFS) | Hardlink data storage is for use during in-place operating system refresh on NTFS volumes and cannot be used if migrating to new hardware. The datastore location specified must be a local location on the computer being migrated. This is an advanced scenario and typically used with additional ITSM software such as SCCM, failure to properly configure the entire process used with hardlink migrations can result in complete data loss. See the Migration Manager Automation Guide command line /HARDLINKS for additional information on using hardlinks. |
| Personality Naming | By default, personality folders use the extraction Computer Name when extracting from Windows, and MACID when extracting offline Windows using Windows PE. The command line /PERSONALITYPATH, or /NAME can be used to override this setting. See the Migration Manager Automation Guide for more details. |
| Exclude MAC Address for Wireless Networks | Excludes MAC Address for wireless networks when personality naming is MACID. |
| Note |
|---|
| The policies to exclude the user’s temporary files and temporary Internet files directories along with the Program Files and Windows directories are on by default and it’s recommended to leave them on unless there is a distinct need to extract files from these locations. |
| Note |
|---|
| The extraction policies impact the behavior of file rules as the policies are prioritized over file rules. Specifically the path tokens %WINDOWS%, %SYSTEM%, %SYSTEM64%, %PROGRAMFILES32% and %PROGRAMFILES64% are impacted (see File Rule Path Tokens for more information). As an example, if the “Exclude the Windows directory” policy is enabled (which is the default), a file rule using the %WINDOWS% path token will not be evaluated. The policy ‘Extract files from profile folders located on network shares’ also impacts user-specific path tokens such as %USERDOCUMENTS% if these folders have been redirected to a network location using Roaming Profiles or Folder Redirection. |
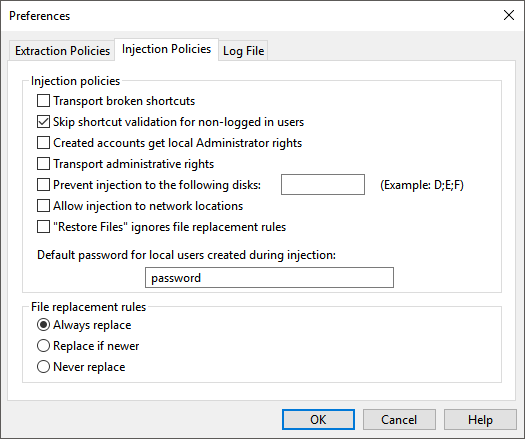
Injection Policies
| Policy | Effect |
|---|---|
| Transport broken shortcuts | By default, Migration Manager validates that a shortcut being injected points to a valid file and if that’s not the case places the shortcut in the directory C:\Broken Links instead. Enabling this policy turns off this validation and all shortcuts are injected regardless of whether they have a valid target or not. |
| Skip shortcut validation for non-logged in users | Disables shortcut validation when injecting user state for users that are not logged on interactively on the system. |
| Created accounts get local Administrator rights | When migrating local user accounts (i.e. not domain accounts) that don’t already exist on the target system, this policy enabled adds the created local user to the local Administrators group. |
| Transport administrative rights | If enabled, this policy causes migrated users to be added to the local Administrators group if they were members of that group on the source system. |
| Prevent injections to the following disks | This policy makes it possible to prevent Migration Manager from injecting data to local drives with the specified drive letters. |
| Allow injections to network locations | If enabled, this policy makes it possible to define File Rules that redirect files to a network location. |
| “Restore Files” ignores file replacement rules | If enabled, the Restore Files function will always overwrite existing files regardless of the defined File Replacement Rules. |
| Default password for local users created during injection | If local user accounts (i.e. not domain accounts) are created as part of an injection, this policy defines the password that should be used for those accounts. |
| Note |
|---|
When the “Prevent injections to the following disks” policy is enabled, any files that were located on those disks on the source system will be placed in a directory named C:\Migrated\<drive letter>_Drive instead.It’s not possible to prevent injection to the C drive. |
| Note |
|---|
| When allowing File Rules to redirect files to a network location it’s very important to make sure that the redirection path includes a user-specific component as you otherwise run the risk of files with the same names being overwritten. The %USERNAME% File Rule token is useful for this purpose (e.g. a redirection path of \\server\users\%USERNAME%).Also note that if this policy isn’t enabled, files located in profile folders that have been redirected to a network location through the use of Roaming Profiles or Folder Redirection will not be injected. |
| Note |
|---|
| If password policies have been defined on the target system or the domain in a domain environment, the default password entered in the preferences dialog must match those password policies otherwise injections that need to create local user accounts will fail. |
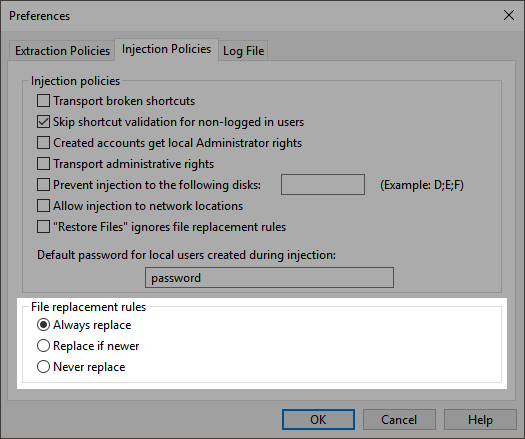
File Replacement Rules
| Rule | Effect |
|---|---|
| Always replace | Migration Manager will always overwrite existing files on the target system with the files being injected. |
| Replace if newer | Migration Manager will only overwrite existing files on the target system if the file being injected has a more recent “last modified” date/time than the existing file. |
| Never replace | Migration Manager will never overwrite existing files on the target system. |
Log File
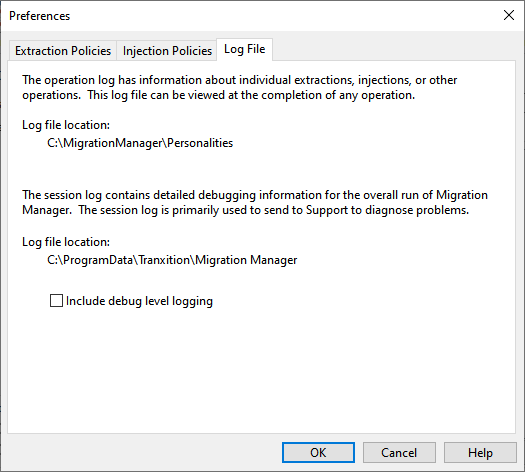
Migration Manager uses two log files:
- An Operation Log that includes information about a particular operation (i.e. an extraction, injection, backup or file restore)
- A session log file that includes information about everything happening in Migration Manager while it’s running.
See Log Files for more information. The preferences dialog allows you to control the amount of information logged to both the operation and session log files.
| Note |
|---|
| Migration Manager only displays the Operation Log file for operations performed through the user interface. Operations performed through the command-line never display the Operation Log (although the Operation Log file, of course, is created and stored in the usual location). |
Content Selection
The final set of data stored in the configuration file determines what application settings and data files are extracted. This selection is done in the Extract User State task view. For a full description, see Extract User State.
With this information stored in the configuration file it’s possible to select different content for different users or user groups and create unique configuration files in order to make the extraction process more efficient and to limit the amount of data that is extracted.
Using AES256 Encryption
Personalities can be AES256 encrypted when storing data in personality files.
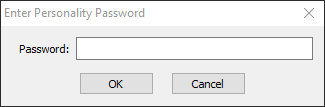
AES256 Encryption with Password
When the “AES256 Encryption with Password” policy (see Extraction Policies) is enabled, Migration Manager will prompt for a password to protect the extracted user data:

Passwords are case-sensitive, must be between 7 to 15 characters in length and may only contain characters, digits and underscores.
| Note |
|---|
Migration Manager only prompts for a password during an extraction performed through the user interface. If you are performing a command-line extraction, the /PASSWORD command must be used to protect the user state data. See the Migration Manager Automation Guide for more information. |
Personalities that are AES256 encypted with password protection are displayed in the personality drop down menu with a gold lock icon:

When injecting or restoring files from user state data, Migration Manager will ask for the password before allowing the operation to proceed:
| Note |
|---|
Migration Manager prompts for a password only for operations performed through the user interface. If the operation is performed through the command-line, the /PASSWORD command must be used; otherwise the operation will fail. See the Migration Manager Automation Guide for more information. |
AES256 Encryption
When the “AES256 Encryption” policy (see Extraction Policies) is enabled, Migration Manager will use an internal key to encrypt the personality with AES256 to further protect the personality from access outside of Migration Manager.
Personalities that are AES256 Encrypted in this manner are displayed in the personality drop down menu with a silver lock icon:

Configuration Files
Since all of the settings that impact Migration Manager operations are stored in the configuration file, it’s often useful to create different configuration files for different migration scenarios. These different configuration files can then be used either interactively (use File | Open in the Migration Manager menu to open a different configuration file than the currently active one) or from the command-line for automation purposes (see the “Migration Manager Automation Guide” for more details on that).
Default Behavior
A default configuration file is installed by the main Migration Manager installer, but if Migration Manager can’t find a configuration file for any reason, a default configuration file is created. The default configuration file is always created on the local system (as opposed to the file share where Migration Manager is located) in the local program data directory C:\ProgramData.
License File Location
For Migration Manager versions that use a license file, the location of the license file may be specified within the configuration file. The default location is the root of the installation folder. This can be changed by using a text editor to modify the configuration xml file. In the configuration file, add (or modify) the License Store section name and License Store Location Setting Key, with the desired path to the license file, to the Profile section of the configuration as shown below. Move the mmlic.lic file to the specified folder.
The configuration file should include the following within the Profile section:
<Section name="License Store">
  <Setting key="License Store Location">\\Server\MigrationManager\Licenses</Setting>
</Section>