Restore Files
Overview
Restore Files makes it possible to restore individual files from extracted or backed up user state data. This is useful when files are needed from user state data but a full injection isn’t desirable.
| Note |
|---|
| Unlike extractions, injections and backup, Restore Files cannot be performed through the command-line. Restore files is not supported to offline Windows environments, nor when using Hardlinks to store the personality. |
Restoring Files
Specifying the Data Store Location
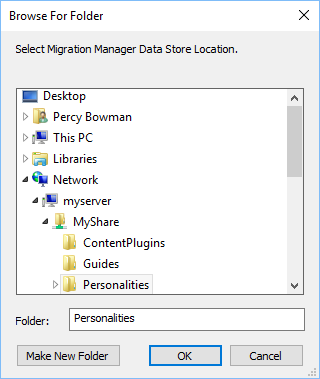
If the data store location needs to be changed from the current setting, click the Browse button at the top of the restore task view:

This displays a standard Windows folder browser dialog to select the new location from which to read the user state data:
The functionality of Restore Files is the same regardless of the data store type. Selecting the User State Data to Restore Files From Right below the data store location is a drop-down list containing the available user state data from the current data store location:

The information provided in the drop-down list includes:
- The date/time the user state was extracted (or last backed up if a backup has been performed).
- The name of the computer from which the user state was extracted.
- Whether the user state data is password protected, indicated by the use of a padlock icon.
Selecting Files to Restore
Once the user state data has been selected, the files contained in it are displayed in the user interface:
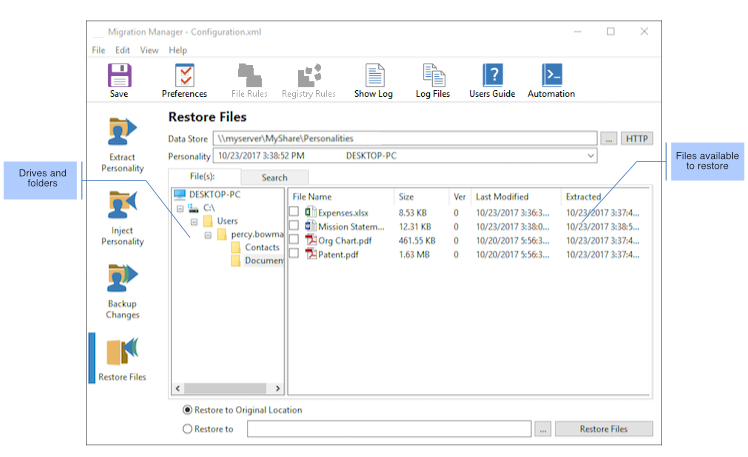
Expand the file tree on the left to see the files available in the different folders. Mark a file for restoration by checking the checkbox in front of the file name in the list to the right. It’s also possible to search for files contained in the user state data by using the Search tab in the Restore Files task view:
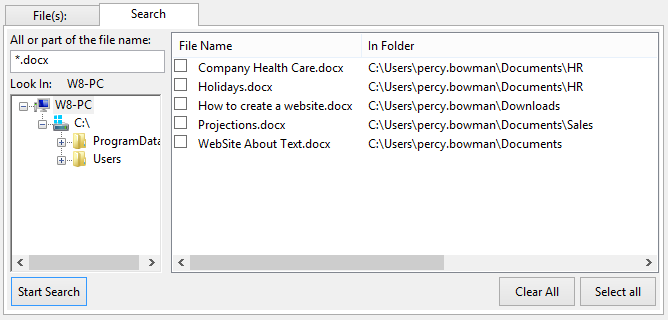
Enter a search term in the search field and click the “Start Search” button to display the matching files in the list to the right. Select files by checking the corresponding boxes.
| Note |
|---|
When searching for files based on name, you need to either specify the exact file name (e.g. Q1 Report.docx) or use the wildcard character (e.g. Q1*, Q1 report.* or *report*). When searching for files based on file type you also use the wildcard character (e.g. *.docx). File names are not case-sensitive |
To restore the selected files, click the “Restore Files” button. A progress dialog shows the progress of the operation followed by a message stating the result of the operation. After the message has been dismissed, the Operation Log file is displayed with information about which files were restored to what locations.
Redirecting Files

When restoring files, it’s possible to redirect them to a different location than the location from which they were originally extracted. Redirection may be global for all files using the “Restore to” field available in the Restore Files task view:
Original location: C:\Project Data\Reports\Q1 Progress Report.docx
Redirection path: C:\Users\hdowd\Documents\Restored Files
Restore path: C:\Users\hdowd\Documents\Restored Files\C\Project Data\Reports\Q1 Progress Report.docx
Click the “Restore to” radio button and then click the “…” button to select the desired location. Following global redirection, Migration Manager preserves the directory hierarchy as shown in this example:
Alternatively, it’s possible to redirect individual files. Double-click the desired file to display this dialog:
Specify the directory the file should be restored to using the “…” button in the dialog. The effect of an individual file redirection is illustrated in the example below:
Original location:  C:\Project Data\Reports\Q1 Progress Report.docx
Redirection path:   C:\Users\hdowd\Documents\Restored Files
Restore path:   C:\Users\hdowd\Documents\Restored Files\Q1 Progress Report.docx
Restoring a Particular Version of a File
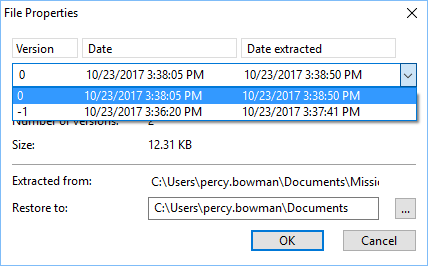
When doing user state data backups, a new version is captured of each file that has changed since the last backup or the original extraction.
To restore a particular version of a file, double-click the desired file to display the File Properties dialog:
The drop-down list in this dialog contains an entry for each captured version of the file. Each version listed includes:
- A version number, starting with 0 for the most recent version, -1 for the next oldest and so on.
- The date the version was last modified.
- The date the version was extracted.
Select the version that to restored and click OK to save the selection.